The Last Days Of Summer.
Please be aware, this is inteded not for professionals, I have no intention of telling you how to suck eggs!
As promised this is the first of two walk through's, this will concentrate on landscapes the second will be black and white street portraits.
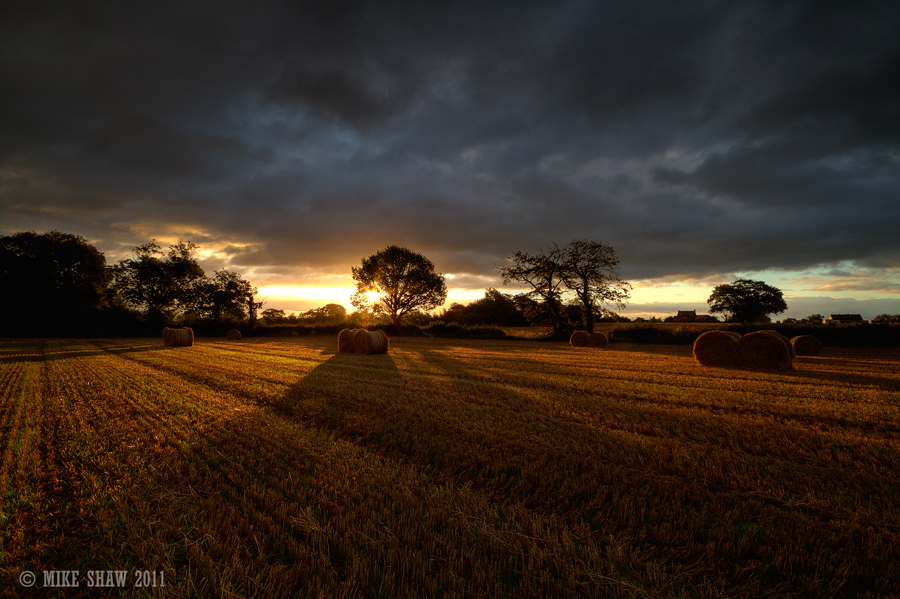
For this landscape I knew in advance what image I wanted as I pass the fields when I travel back and forth to work, sometimes you are spontaneous in your approach, other times you will know. When you find yourself in a position to plan a shoot do just that. Check the weather prior to going out, for this I also checked the sunrise times. I knew I had only a short window of opportunity as between the time of finishing work and the full sun rise was only short. I also wanted the bails of hay in the shot and knew they would not spend too much time in the filed due to the wet weather we have been having. Farmers check the weather more often than photographers, the bails were taken to storage later the same day as this photograph.
So I knew what I wanted to photograph, I knew the location and I knew of the most important part, the light. From here on in it was a case of preparation.
The kit I carry with me is:
Canon 7D (gripped)
Lenses I take most of the time:
Canon 70-200mm F2.8L IS USM II
Canon 28-135mm F3.5 IS US
Sigma 10-20mm EX F4.0
Canon 50mm prime F1.8
(I have others but these tend to be the lenses I carry)
Tripod (nothing too expensive as I have a tenancy to kill them)
Lee Big Stopper Filter and foundation kit
0.3, 0.6 and the 0.9 soft ND grad filters.
Remote shutter release (TC 80N3)
For this shot I used the Sigma wide angle lens with the foundation kit mounted and the 0.6soft ND grad. The camera I set up as:
Manual mode in Landscape setting , I have mine set up with the sharpness taken up by +1, the rest set on 0. F stop was set to F13, ISO at 100, White balance set to auto (I find it easier to adjust white balance in post production if needed rather than play with the manual mode on the camera) Metering was set up on spot metering (more on that later) and I had a manually selected single point AF. Auto light optomizer set to low.
For the shot I was going to use hyper focusing, for those not aware of this, its something like this.
Using a single AF point at bottom centre I focused on a point some 30 feet into the frame, with the F stop set at anywhere between f11 to f18 the image should be focused and sharp from the foreground to the background, more information here:http://www.picturecorrect.com/tips/hyperfocal-focu
I knew the sun would be rising behind the trees and I wanted to use that, we rarely get good results from most images shooting into the sun unless we find a way to defuse it, on this occasion I was going to use the tree to do just that. Combined with the soft ND grad I knew getting the right exposure without blowing out the lighter part of the sky would be easier. I was also using spot metering, I chose a lighter grey cloud in the sky to set my exposure to with the spot metering, using this I knew the rest of the image would be balanced. Once I had the exposure set it was a case of bringing the focal point to where I wanted and simply waited. Once the sun hit the right part of the tree I took my image, the long drawn out shadows were a bonus. The focal length was 10mm (widest) and the exposure time was set at 1/15 secs, because of this I could take the images hand held.
I now had my image and the next stage was post editing.
For this image there was not too much editing but what I did was:
Raw file converted in Photomatix to be tone mapped. The RAW processing options were set up prior to the conversion as, Noise reduction set at 80%, Reduce chromatic aberrations selected, white balance as shot and colour space set at sRGB.
Slider setting within Photomatix were set as:
Strength: 80
Colour Saturation: 60
Luminosity: 2.9
Microcontrast: 10.0
Light Mode: Max
White point: 0.276%
Black Point: 0.333%
Gamma: 1.50
Temperature: 2.1
Saturation Highlights: 0.9
Saturation Shadows: 1.5
Micro-Smoothing: 30.0
Highlight Smoothnes: 6
Shadows Smothness: 0
Shadows clipping: 0
Image was then exported to CS5, using Nik Softwares Colour Efex pro a Skylight filter was added at 12% to give more warmth to the sunlight and the image was globally sharpened.
Remember though, no amount of post editing will make a poor image a good image, you have to get the basics right, set the camera up as much as possible to give you the best staring point, the more you have right in camera, the less post editing you need to do, unless of course your like me and simply enjoy the fiddling about with it ;)
2 comments:
Thank you Mike that was very helpful and interesting and well written Walk Through. Found it very helpful thanks again
Thank you for taking the time to write this up and post it. The most interesting part for me is the discussion on the ND grad filters. I've been interested in acquiring these for some time but am still evolving toward that point. Soon though!
Post a Comment